Backend for Open Source Android, iOS and Web Messenger
Adding a login mechanism to an app is a fundamental part of building secure applications that require user authentication. You need to implement a registration process where new users can sign up for your app by providing their information, such as phone, email, username, and password. Once users provide this data, your app communicates with your server to perform the authentication process, which requires the creation of APIs on your server for authentication. It’s important to note that this process is entirely independent of mesibo, and the implementation of your login mechanism is at your discretion.
Just like any other app, a messenger app also requires authentication by connecting to your servers. To expedite the deployment process, we have provided basic APIs that you can download, customize, and run on your own server for authentication. We will refer to these as Private Backend APIs.
Consequently, the messenger apps you have just built use two types of APIs:
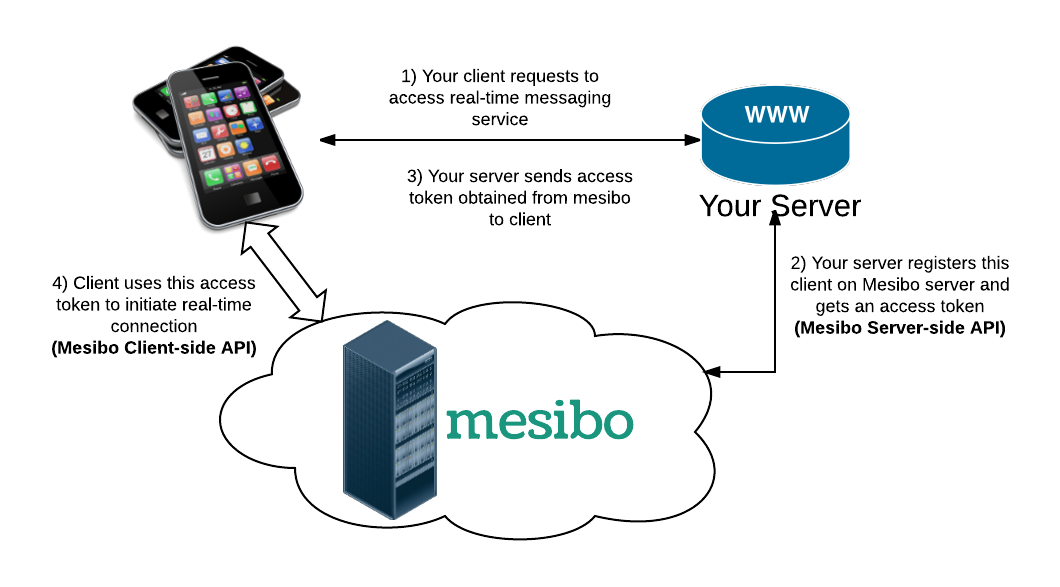
Private Backend APIs for authentication and creating users. These are private backend APIs that are only meant for use in the demo messenger apps. The messenger apps connect to your private API for login. If login is successful, the private API connects to the mesibo backend API to create a user token. The need for private APIs arises because the mesibo backend API requires an App token, which is kept secret for security reasons, and thus, your users cannot directly invoke the mesibo API.
mesibo Real-time APIs for real-time messaging, voice, and video calls. These APIs are on the users’ side. Previously, you have used both kinds of above APIs which are already hosted by mesibo so that you can quickly play with the apps. In this part, we will learn about hosting private APIs on your infrastructure.
Messenger Private APIs
In this part, we will describe briefly how messenger Private APIs work, how to host private APIs on your infrastructure and extend it to your needs, for example, changing to the different authentication mechanisms.
Before you continue:
Ensure that you are familiar with mesibo APIs and have already gone through Getting Started guide.
Remember that, private APIs are not the replacement for mesibo backend APIs. As mentioned above, private APIs invoke mesibo backend APIs. You will still need to invoke mesibo API at https://api.mesibo.com/backend/ for adding users, groups, members, etc.
If you are using the app as it is, you will require an SMS service provider to send OTP for login verification. If you like to change the authentication mechanism to something else, say, email or enterprise login, refer to the section below - Using different authentication mechanism.
Let’s get started.
User Login and Authentication
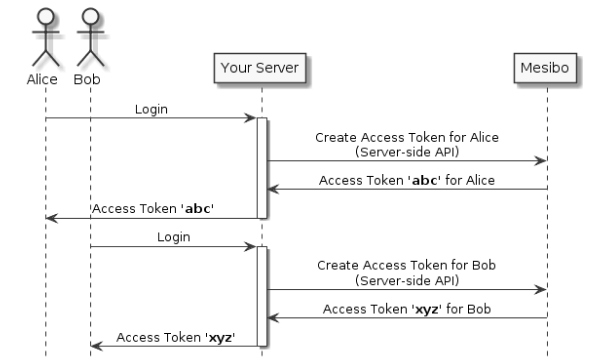
When a new user signs-up up, the messenger will communicate with private APIs for login and verification. The private APIs verifies the new sign-in (say, using username/password, OTP, etc.). If successful, it registers this user with mesibo using mesibo backend API. mesibo returns a token for this user which you can give it to your app so that your app can communicate using mesibo real-time API.
Refer, Getting Started guide for more details.
Your goal is to create a mesibo user and generate an access token for a valid user. The way you determine whether a user is valid or not, how you implement the authentication step is up to you. For example, messenger demo applications use simple phone authentication. An OTP is sent to users’ mobile number for verification. When the user enters OTP for verification, private API contacts mesibo backend API to generate an access token.
The way you determine whether a user is valid or not is entirely up to you. Your app can decide how you implement the authentication method (say, email, OAuth2, Radius, LDAP, or anything of your choice) and modify the private API accordingly.
The following API request will inform the private API to initiate a login and send an OTP to the phone number the user signs up with.
https://messenger.mesibo.com
with payload,
{op: "login", phone: "18005551234", appid: "com.messenger.appid"}
You will get a response like below
{op: "login", ts: 1592890269, result: true}
Once the user receives an OTP and enters, the messenger will invoke the same API but with OTP this time. If OTP matches then authentication is successful and in response to this request you will get the access token generated for that user.
For example, if the OTP received on the phone number is 123456, API will be invoked with OTP
{op: "login", phone: "18005551234", appid: "com.messenger.appid", otp: "123456"}
On success, the API will send a response similar to the following:
{ op: "login", result: true, token: "bfab7bxxxxxxxxxxxxxxxxxxxxxxxxxx", ... }
If the response[‘result’] is true meaning that the API request is successful and the access token is available un in response[‘token’]. Messenger apps then use this access token to initialize mesibo real-time API. Messenger apps also initiate contact synchronization immediately after the login.
Now we will learn how to host private APIs on your server.
Hosting Messenger Private APIs
Prerequisites
Before we dive into setting up the private APIs for the Messenger apps, please ensure that the following servers are running.
A web server with HTTPS and PHP support. Depending on the web server (apache / h2o/ Lighttpd/ Nginx) you are using, the setup varies. In the subsequent examples, we will assume that your hostname is
example.comand the backend code which you will download soon is accessible via URLhttps://example.com/index.phpMesibo API Key and the App token. Refer to First Mesibo App tutorial to learn about how to get API key and App token.
We will also need Google Maps keys which we registered in the previous part.
Downloading the private APIs Source Code
The latest code for the private APIs is always updated and pushed on messenger-app-backend repository
To download, open a terminal and issue following commands:
$ git clone https://github.com/mesibo/messenger-app-backend.git
Ensure to Star(*) the project on GitHub to get notified whenever the source code is updated.
Configuring the Private API
We now have all the information to configure and go live with private API on your own servers.
Open mesiboconfig.php in the downloaded code and enter app token which you obtained from the mesibo console.
That’s it! We are now ready to test the backend!
Testing your Private API
It’s time now to test the backend. Use curl, postman or any other tools to send a test request
{op: "login", phone: "18005551234", appid: "com.messenger.appid"}
Using curl
$ curl --header "Content-Type: application/json" --request POST --data '{op: "login", phone: "18005551234", appid: "com.messenger.appid"}' https://example.com
this should output like the following
{op: "login", ts: 1592890269, result: true}
Above output indicates that the backend appears to be set up correctly. The next step is to update the Android and iOS Apps you have built in previous parts with the new backend.
Sending OTP to your users
The private API generates an OTP and prints it to the PHP error.log which you can use for testing. However, for a real deployment, you need to send OTP to the user for them to enter it on the login screen. You need to modify the backend API function sendOtpToUser to send OTP to user. You can use any SMS provider to send the OTP to the user.
Refer to the sendOtpToUser function in the private APIs to learn more.
function sendOtpToUser($phone, $otp) {

    // add your code here to send SMS to your users using your preferred SMS provider
}
Push Notifications
The last set of information you need is to enable push notification for Android and iOS. You will need the following credentials:
- Google FCM/GCM Key for Android Push notification.
- Apple VoIP Certificate and passphrase.
Refer to Google FCM and Apple push notification document to get above credentials. Once you get them, you need to configure Push Notification credentials in Mesibo Console by clicking on your App and then in Push Notifications tab. Refer to the mesibo Push Notification Documentation to learn more.
Configure Apps to use your Private API
Edit the following files in the Messenger apps to use your own private API URL (replacing https://messenger.mesibo.com with the new one).
Android
- Edit
app/src/main/res/values/strings.xmland enter Google map key in theGOOGLE_MAP_KEYfield. - Edit
SampleApi.javaand changemApiUrlwhich is pointing to https://messenger.mesibo.com to your own private API URL.
iOS
- Click on Info.plist, enter Google map key in the
GoogleMapKeyfield. - In the same file, enter your own private API URL in the
MessengerApiUrlfield.
Javascript
- Exit mesibo/config.js to change the URL
That’s it. Recompile both the apps and start using it!
You can now see any new user and group you create in the Mesibo console along with statistics.
Using different authentication mechanism
For the messenger, we have used phone-based authentication. It is just an example and we do not recommend or enforce any particular login method. You can replace it with any other authentication mechanism, for example, email, user-id, LDAP, RADIUS, OAuth2, Kerberos, SAML, etc. All you need to do is that you generate a mesibo user token using your secret App Token only after your user passed your authentication.
These are two places where you need to make changes:
your own login screens so that your users can enter the required credentials, for example, email, user-id, or the password.
Private APIs. You can change it to whatever authentication check your App does. For example, checking your own database for a valid user.
Conclusion
In this part, we have learnt about hosting private APIs on your own infrastructure. In the next part, we will learn about how to host Mesibo real-time server on your own premise.