In this part, we will explore the {{page.platform}} Conferencing app.
Let’s get started.
Prerequisites
Before we dive into running a fully featured Conference app for {{page.platform}}, ensure that you go through the following
- Must read the first part of this tutorial and Prerequisites mentioned there. {{prerequisites}}
Before we get into the code, we recommend that you build the app and try it out, to have a feel of how the app works. This is a basic conferencing app with all the essential features. You can easily refer to the source code and the documentation, to modify it to your needs.
{{build_instructions}}
Running the App
Let us first run the app and do a brief walkthrough of the various features in the app. Once you are familiar with the various conferencing operations, we will get into the code walkthrough.
The first step is to Log-in using your email. Enter your name and email address. You’ll quickly receive a verification code. Enter it and you are in!
Once you have logged in, you can join a conference. If you have the room-id and PIN of a certain room, you can join an existing room by entering them. You can also Create a Room to hold a conference and invite others. To do this, select the Create Room option. Provide a room name and click Create Room. A room will be created and you will now start publishing your video.
To Invite other participants to the room, share the room credentials. Every room will have a group-id and pin. You can copy the invite text- containing the room-id and pin and share it with the participants who you want to join the room!
Any participant can now join the room by entering the room-id and the PIN. Once, they enter the room they will start publishing their stream and everyone in the room can view them.
You can also see your room history by clicking on the My Rooms button. It will display a list of all rooms that you are part of. Click on a room to quickly enter it without entering the PIN.
You can also mute participants, mute your own audio or video, chat with each participant and group, send media and files in chat, share your screen, etc. For per participant controls tap or click on their video. Control buttons will be visible. For your self stream controls, use the buttons at the bottom of the screen.
Source Code Walkthrough
There are two major components in this app:
{{page.platform}} Conferencing APIs, these APIs are used by your app for initiating a group call, publishing streams, subscribing to streams, etc. You can learn more about using the conferencing and streaming API in Quick Start with Mesibo Conferencing API - {{page.platform}}.
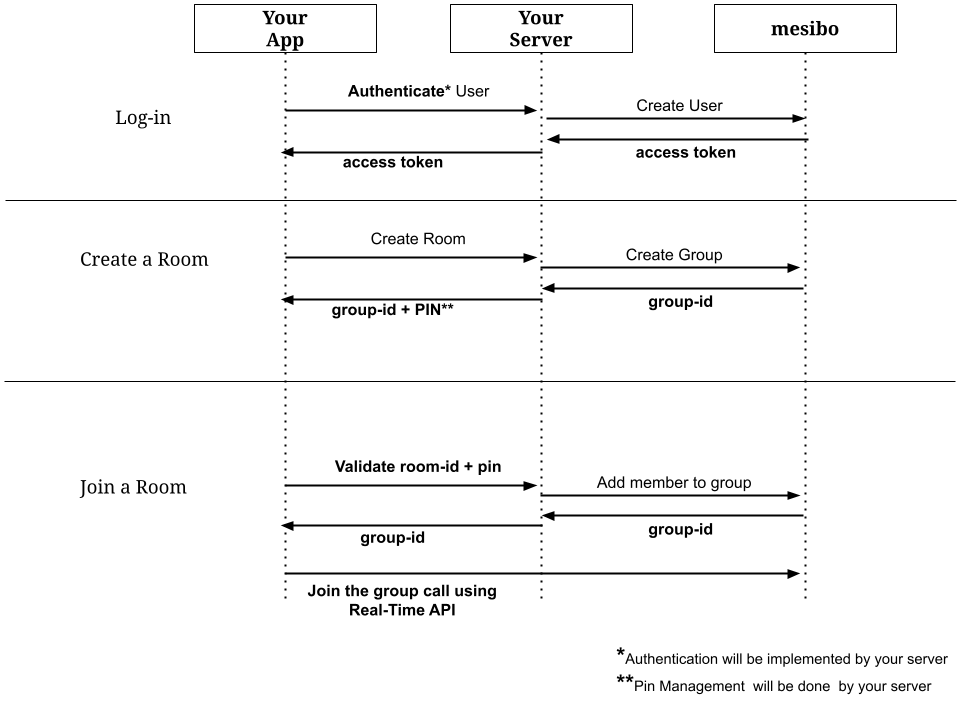
Administrative APIs, These are not the mesibo APIs but they are private APIs for the demo. You need to host them on your server to perform various administrative tasks such as log-in, creating a room, entering a room, etc. Your app connects to your server using these APIs. In turn, your server invokes the mesibo Group & User Management APIs internally to perform the required operation. For example, when you want to create a room, your server will create a mesibo group. When you want to join a room, your server will add you as a member to the mesibo group. After your user logs in, your server will create a mesibo user and generate an access token. We will learn more about this in the section Setting up the Admin API
Refer to the image below which demonstrates how the admin APIs work through your server and uses the mesibo group/user management APIs.
We will now go through the {{page.platform}} conferencing app source to learn how various conferencing features are implemented.
Log-in
The first step in the app is to authenticate the user and generate a mesibo access token for that user. Note that, mesibo is independent of the authentication and does not provide any APIs for implementing authentication. You need to implement your login method and then proceed to generate an access token on successful authentication.
In this demo app, we will be using an email-based login as an example. We will send an OTP to the user’s email. If the user enters that OTP, then they will be able to enter the demo. We make use of an Admin API called login on the server end, to achieve this. Refer to the section on Setting up the Admin API- Log-in to learn more.
Using the login REST API is a two-step process.
Pass the
appid,name, andemailas parameters and invoke the REST API.An OTP will be sent to the email by the server. The user needs to enter this OTP. Invoke the REST API, with the parameter
codecontaining the OTP. The server will now validate the OTP and email combination. If successful, it will send a mesibo access token in response.
{{login}}
Creating a Room
To create a room, you need to create a mesibo group. Since the client app can’t directly create a mesibo group (as it requires the secret app token), it will request Admin API to create a group.
The client invokes the setgroup REST API with the mesibo access token(that you generated in the login step), room name, room resolution as parameters. When this Admin API is called on your server, it will create a group using mesibo Group Management API. You can learn more about this in the section Setting up the Admin API- Create a Room
{{create_room}}
The admin API will also generate PINs for the room and will store them in a database so that it can authenticate users wanting to join the room. A user needs to enter a PIN to join a room with a certain room-id.
Every mesibo group will have a group-id. The app will be receiving the group-id, in the response(in the field gid) after calling setgroup. We will be using this group-id to join the group call.
Pin Management
The admin API will randomly generate two numbers for each room, which can be used as a pin to enter a room.
- pin, To be shared with users who need to be active participants in the room. They will be able to make voice and video calls at the conference.
- spin, Subscriber-only pin. To be shared with users who can only silently participate in the conference. They will not be able to make a call, but will only be able to view others.
{{create_room_pin}}
Joining a room
To join a room, you need to use the mesibo real-time conferencing APIs. However, before the user can use real-time APIs, the user must be a member of the group. Hence, the user first needs to request admin APIs to join a room using the room-id and the PIN. If they match, the admin API will add the user as a member of the group using mesibo group management APIs.
{{join_room}}
Once the user is added to the group, the next step is to use the real-Time APIs to join the Group Call
Using the Real-Time API to join the Group Call
Once, you successfully create a room or enter a room, we will display the group call screen.
{{launch_group_call}}
Starting the Group Call
Once the fragment is loaded, we create a group call object and join the call. The app then starts publishing your stream, if you have permission to publish. {{start_group_call}}
Viewing Others
Your app needs to implement the GroupCallListener so that it can notify you when other participant joins and leaves the room by calling MesiboGroupcall_OnPublisher. It also notifies you when a participant subscribes to your video or voice streams through MesiboGroupcall_OnSubscriber.
{{viewing_others}}
Using this Participant object, you can subscribe to them and view them. Refer to the documentation on subscribing to streams to learn more.
While subscribing to a stream, you also need to implement the GroupCallInProgressListener and pass it to the call method which informs you of various participant events so that you can easily update your App UI or take necessary action, such as,
{{listeners}}
Displaying Streams
You need to use MesiboVideoView to display self or other participant’s video. You can use MesiboVideoView in your layout to display videos as you like.
{{display_streams}}
Refer to the documentation Display Streams to learn more.
{{ participant_list }}
Conferencing Operations
We will now look at some of the common operations in conferencing such as muting a stream, sharing screen, talk detection, playing sound, hanging up, etc and the APIs used to implement it in the App.
{{conf_ops}}
Handling Mute
{{mute}}
To learn more about handling mute refer to the documentation Muting Audio or Video.
Talk Detection
{{talk_detection}}
Refer to the documentation about Talk Detection to learn more.
Screen Sharing
To start sharing the screen, set the video source of the local publisher to MESIBOCALL_VIDEOSOURCE_SCREEN.
{{screen_sharing}}
If you wish you can create multiple publishers and set different video sources for each publisher. You will then be able to simultaneously share the screen and camera. Refer to the documentation on Set the Video Source to learn more.
Play Sound
{{play_sound}}
Group Chat and One-to-One chat
{{chat}}
Hanging Up
{{hang_up}} Refer to the documentation on Handling Hang Up to learn more.
Leaving the Room
To leave the room, call the leave method on the group call object.
{{leave_room}}
Conclusion
{{conclusion}}