Self-Hosted mesibo – Install and Run mesibo on Your Own Infrastructure
mesibo lets you run the entire mesibo real-time platform on your own servers. All messages and calls are routed through your own data center and stored in your own database — mesibo has no access to any of it. Getting started takes just a few steps using the mesibo Docker image.
Why Self-Hosting
Privacy and Data Security
Keeping your data on your own infrastructure is the most reliable way to protect it. Regulatory requirements like GDPR and HIPAA, concerns about unauthorized data harvesting, and incidents like the Cambridge Analytica scandal all point to the same conclusion: your data is safest when it stays within your control.
With mesibo On-Premise, everything runs on your own servers or private cloud. All messages and calls pass through your own data center and remain in your own database. Neither mesibo nor anyone else has any access to the data.
Custom Modules and Technical Advantages
On-Premise unlocks capabilities that are not possible with cloud deployment. Most notably, you can extend mesibo by writing and loading your own modules — custom code that runs inside the mesibo process for tight integration with your backend, AI pipelines, or any other infrastructure. For example, you can connect mesibo directly to LLMs like OpenAI or Claude, plug in vector databases for semantic search, build AI-powered chatbots and assistants, or run any custom processing logic on every message. Refer to the tutorials for details.
Pricing
Contrary to what many assume, On-Premise is actually cheaper than our cloud offering — in two ways. First, the per-user price is lower. Second, there are no bandwidth charges, no storage charges, and no other usage-based fees. With cloud, you pay per user and for every GB of bandwidth and storage consumed. With On-Premise, you pay per user only — that’s it. As your user base grows, the savings are substantial. Refer to the pricing page for the exact breakdown.
Features
- All mesibo features: messaging, groups, voice and video calling, conferencing, chatbots, push notifications, scripting, etc. All running on your own infrastructure
- Complete control over your data — all messages and calls route through and stay in your own servers
- Unlimited bandwidth, storage and data retention
- Private and public deployment
- Auto fallback to mesibo cloud as a backup, if required
- Loadable modules to add custom features
Prerequisites
Before installing mesibo On-Premise, ensure that you are:
Familiar with the mesibo API and already using mesibo on our cloud services. If not, refer to the getting started guide and tutorials first.
Familiar with setting up a Linux server and MySQL database. If not, refer to online tutorials for the Linux distribution of your choice.
Although not essential, basic knowledge of Docker and Docker containers would be helpful. Refer to the Docker documentation for guidance.
Server Requirements
mesibo On-Premise requires the following:
- Linux 64-bit server (or an always-on instance) with at least 8GB of free RAM. mesibo supports all major Linux distributions that support Docker. It is tested on:
- RedHat / Rocky / Oracle / CentOS 8.x and later
- Ubuntu 20.04 and later
- Mint
- Debian
- Fedora
- SLES
- MySQL (or MariaDB) version 8.x or later. Be sure to disable MySQL strict mode. mesibo will automatically create the necessary tables, so you do not need to worry about the database schema. It is recommended to run MySQL on a separate server with SSD storage and at least 8GB of RAM (32GB recommended) dedicated to the InnoDB cache. Set
max_connectionsto at least 1024 to handle your user load. - RAM — approximately 2KB per user and 4KB per simultaneous connection.
- CPU — mesibo is very lightweight, so any modern CPU should suffice. mesibo On-Premise has been load-tested for 1 million concurrent users on a standard dedicated server with an Intel i7 12th Gen. We strongly recommend using a dedicated server exclusively for mesibo, as it runs multiple processes including the real-time server, backend APIs, and FastCGI server. VPS deployment is only suitable for small setups with a few thousand users. Most cloud vCPUs underperform compared to equivalent bare-metal configurations, so a dedicated server is preferred. If you use cloud deployment, ensure instances are always-on and perform load testing to determine the optimal configuration for your needs.
Should I recompile my apps to work with mesibo On-Premise?
No. If your apps use the latest mesibo APIs, you only need to configure your On-Premise server in the mesibo Console and tell mesibo to redirect your users to your own server. All users will immediately stop using mesibo cloud servers and start using yours. The rest remains the same.
mesibo cloud servers run the same software as On-Premise. So whether you use mesibo Cloud or a dedicated mesibo On-Premise server, there is no change in how you use mesibo APIs or deploy your application. If your data center has issues, you can fall back to mesibo Cloud Services with a single click.
Setting up mesibo On-Premise
Setting up mesibo On-Premise is straightforward. You only need to provide minimal information about where the platform should store data (your database), and the hostname, — mesibo takes care of the rest.
Step 1 - Install Docker
mesibo On-Premise is distributed as a Docker image, so Docker is the only prerequisite. If Docker is already installed and running on your server, skip to Step 2.
Install Docker with:
$ sudo curl -sSL https://get.docker.com/ | sh
Once installed, start the Docker daemon. If your system uses systemctl:
$ sudo systemctl start docker
$ sudo systemctl enable docker
Or, if your system uses the service command:
$ sudo service docker start
Verify the installation by running:
$ sudo docker run hello-world
You should see:
Hello from Docker!
This message shows that your installation appears to be working correctly.
Step 2 - Download mesibo On-Premise Platform
Download mesibo On-Premise docker image by running the following command:
$ sudo docker pull mesibo/mesibo
This downloads and installs the mesibo On-Premise platform on your server. Before launching it, you need to configure it in the mesibo Console.
Step 3 - Configure mesibo On-Premise
mesibo On-Premise requires no configuration files. All configuration is done through the mesibo Console. Pass your app token to the On-Premise server, and it automatically fetches and applies the full configuration. mesibo On-Premise supports local configuration too, but we recommend starting with console-based configuration.
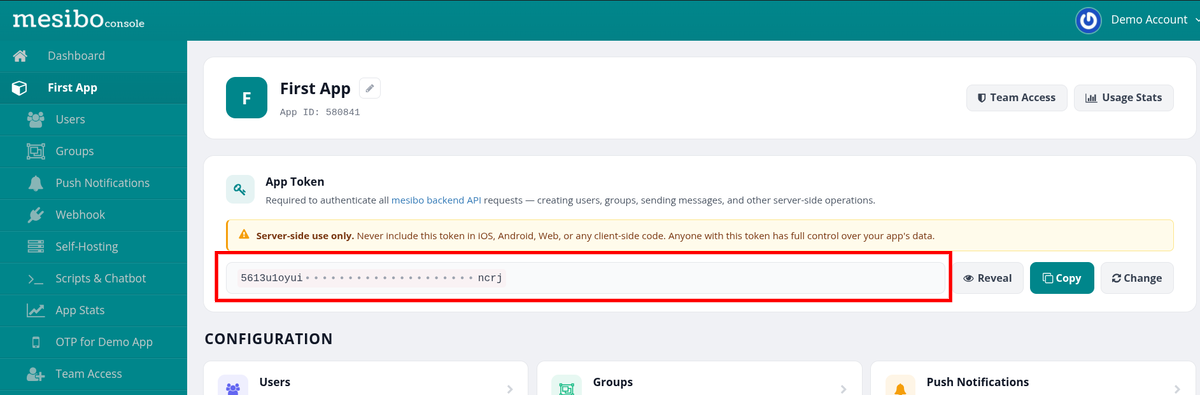
Log in to the mesibo Console and select the application you want to host on your On-Premise server. Make a note of the app token — you will need it to start the On-Premise server.
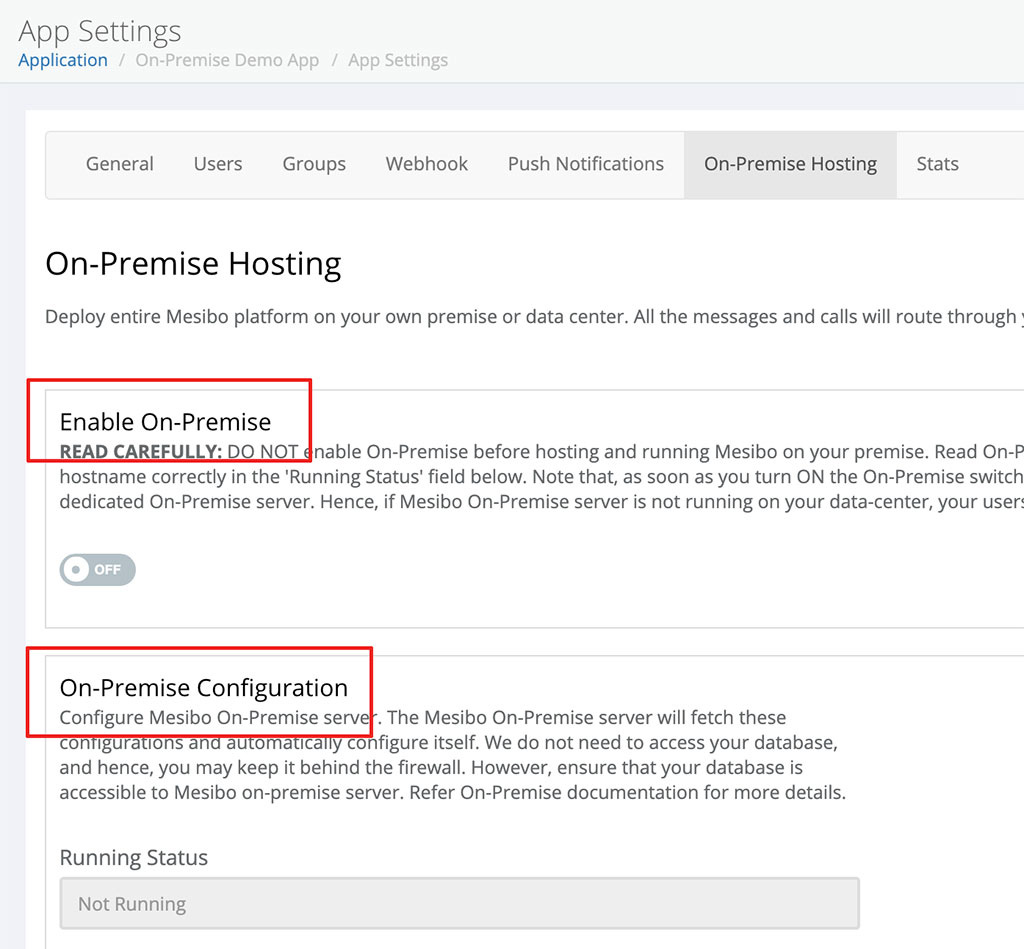
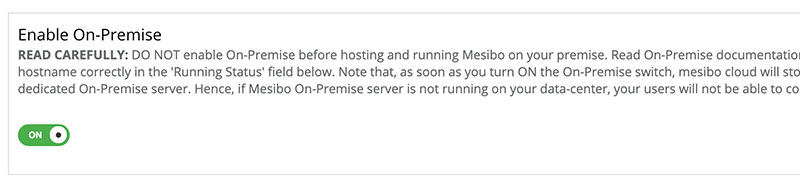
Go to App Settings → On-Premise Hosting. You will find two sections: Enable On-Premise and On-Premise Configuration. Enter your configuration in the configuration section.
Warning: DO NOT turn ON the
Enable On-Premiseswitch before you have fully configured and started your mesibo On-Premise server.
The required configuration fields are:
- Database Information — You will need a MySQL database and a user with full privileges on it. Provide the database host, name, username, and password. Do not use
127.0.0.1as the database host — this does not work in a Docker environment. Use the actual hostname or IP address.
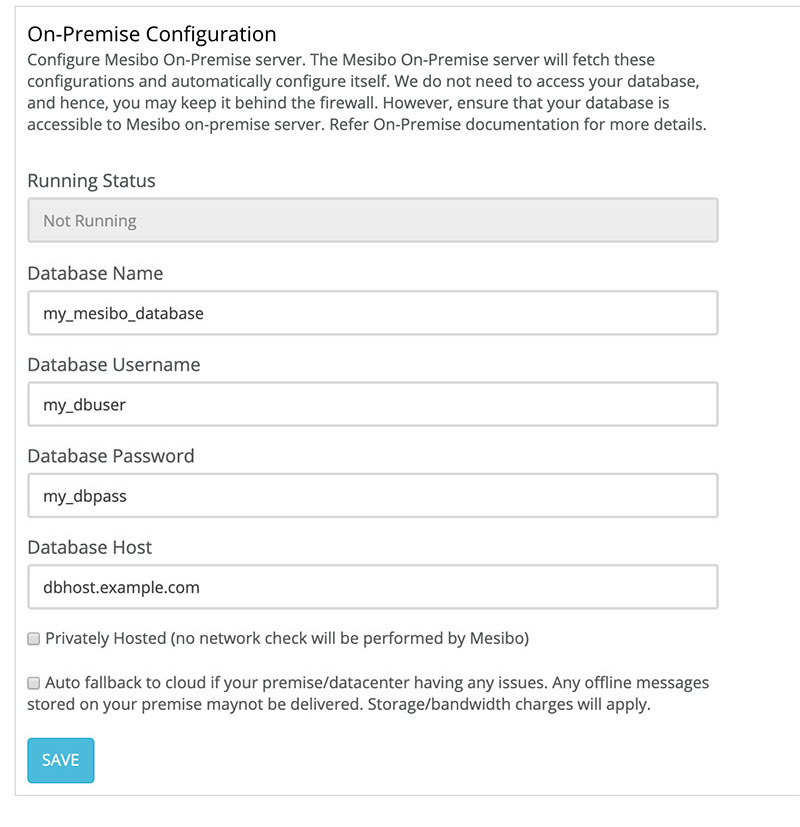
There are two additional optional configuration checkboxes:
Privately Hosted — In this mode, mesibo Console will not check for hostname correctness or network connectivity. Select this if you are running mesibo On-Premise on a private network or intranet.
Auto Fallback — Enable this if you want users to fall back to mesibo cloud when your data center has an issue. Note that some offline messages will not be delivered in fallback mode, since mesibo cloud has no access to your database.
Step 4 - Configuring TLS Certificate
mesibo On-Premise requires a valid TLS certificate. While mesibo can generate a self-signed certificate automatically, self-signed certificates will not work in web browsers since they require a CA-signed certificate. We strongly recommend configuring a valid CA-signed certificate.
You can use an existing certificate from your web server, or obtain a free certificate from Let’s Encrypt (recommended). Ensure the DNS entry for your certificate hostname points to your On-Premise server.
mesibo loads TLS/SSL certificates from the /certs folder inside the Docker container. You map a folder on your host — containing your certificate files — to /certs using the -v option in the run command (shown in Step 5). The folder must contain: cert.pem (certificate), privkey.pem (private key), and chain.pem (CA chain). For example:
$ ls /etc/letsencrypt/archive/mesibo.example.com/
README  cert.pem  chain.pem  fullchain.pem  privkey.pem
Note: Wildcard certificates are not currently supported.
Step 5 - Run mesibo
You are now ready to run mesibo On-Premise. The Running Status field in the Console will initially show “Not Running”.
Run mesibo using the following command, replacing <APP_TOKEN> with the token you noted in Step 3:
$ sudo docker run -v /etc/letsencrypt/archive/mesibo.example.com:/certs --net=host \
	--ipc=host --name mesibo --rm -d mesibo/mesibo <APP_TOKEN>
The --ipc=host flag is required for mesibo’s inter-process communication between its internal components (real-time server, backend APIs, and FastCGI server). For example:
$ sudo docker run -v /etc/letsencrypt/archive/mesibo.example.com:/certs --net=host \
	--ipc=host --name mesibo --rm -d mesibo/mesibo xhc2sayx05ba2l5cralockbicqjsvv1nsqxs0x1yclfv0qvyg1q
On successful launch, the logs should look like this:
E2002-130532-555 (154338): opening db: mesibo_onp
I2002-130532-556 (154322): Starting mesibo
E2002-130532-558 (154322):
+------------------------------------------------------------------+
|                    mesibo on-premise is ready                    |
+------------------------------------------------------------------+
| Build: 10062 (Fri Feb 20 06:36:29 2026)                          |
| App Name: Your App Name                                          |
| App ID: 123                                                      |
| Database: mesibo_onp@127.0.0.1                                   |
|                                                                  |
| Network Configuration:                                           |
|   Certificate: mesibo.example.com                                |
|   IP: 192.168.1.101                                              |
|   Ports: 443, 5222, 5443                                         |
|                                                                  |
| Ensure these ports are open for incoming connections             |
+------------------------------------------------------------------+
Since the container was started with --name mesibo, you can view logs at any time using:
$ sudo docker logs mesibo
If you need the container ID for any reason, run docker ps:
$ sudo docker ps
CONTAINER ID        IMAGE                 COMMAND                  CREATED             STATUS              PORTS               NAMES
7508d3d78992        mesibo/mesibo  "/mesibo/bin/mesibo …"   8 seconds ago       Up 7 seconds                            mesibo
and run,
$ sudo docker logs <CONTAINER_ID>
If the logs show errors preventing startup, refer to the Troubleshooting section.
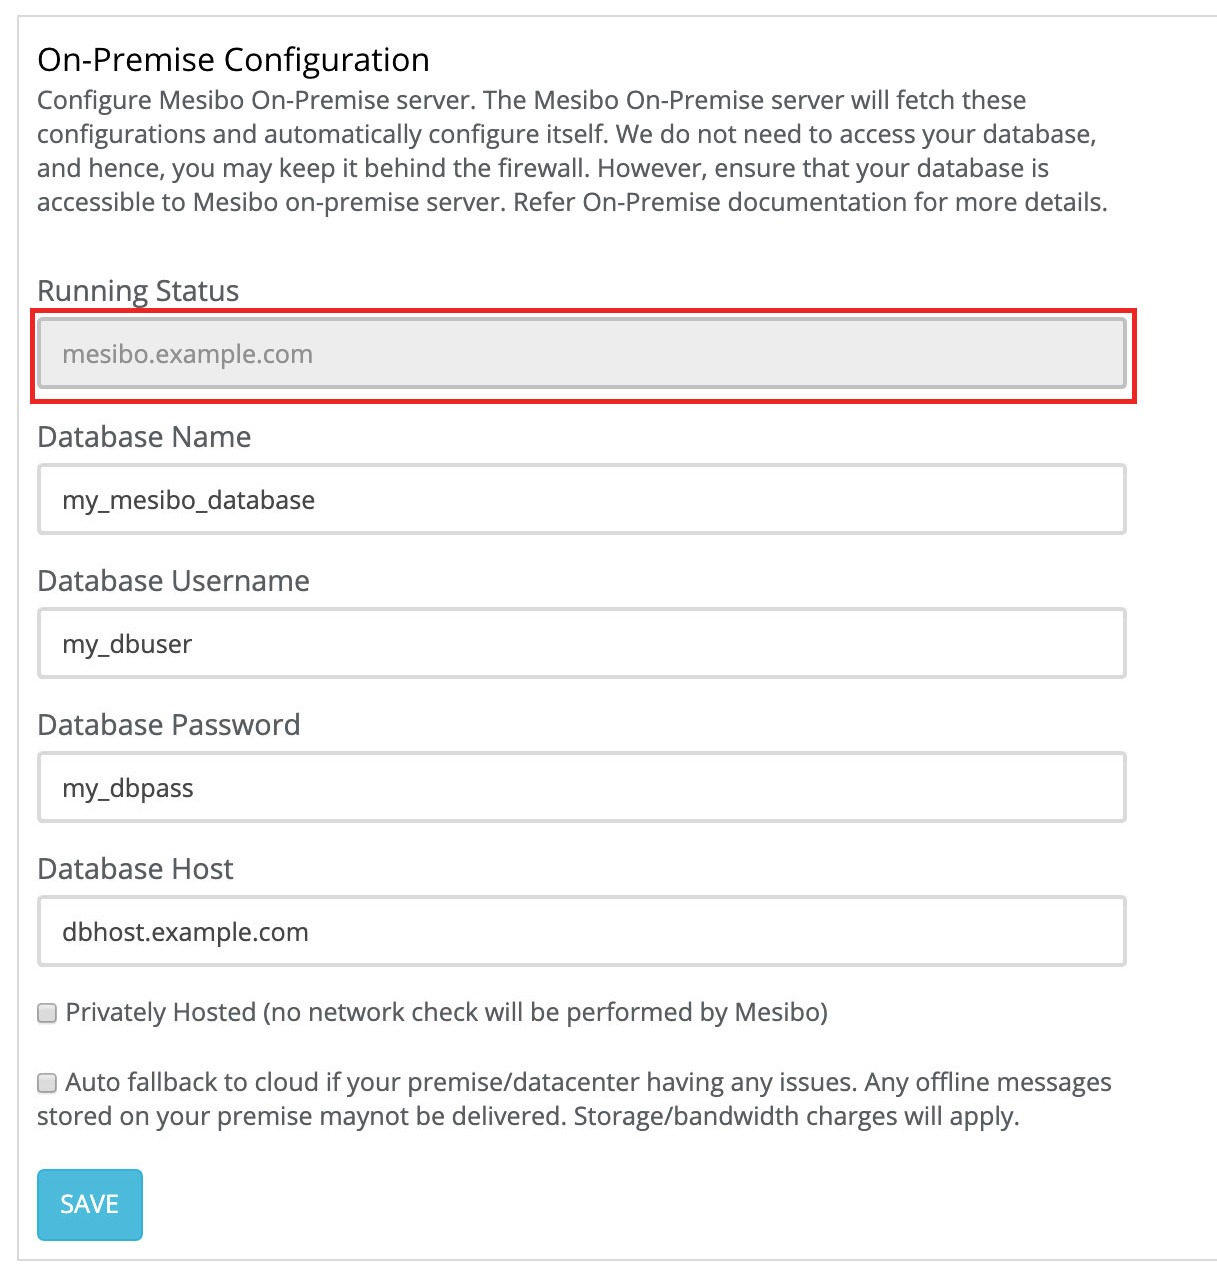
Now check Running Status in mesibo Console → App Settings → On-Premise Hosting. If mesibo has started successfully, the field will show your hostname instead of Not running.
If your On-Premise server is set up properly, continue to Step 6. Otherwise, refer to the Troubleshooting section.
Step 6 - Enable On-Premise
Once your server is confirmed running, enable On-Premise from the Console. All your users will be notified to connect to your On-Premise server instead of mesibo cloud.
Turn on the On-Premise switch. Your users will start connecting to your On-Premise server immediately. You will see login entries like:
E2002-123802-272 (152036): login: address=<user-address> uid=<uid> uac=0 links=0 linked=0 v=2090000 dt=1
mesibo is now running on your own infrastructure.
Firewall Settings
mesibo listens on TCP ports 5222, 5223, 4443, 5443, and 8443. All five ports must be open on your Linux host. mesibo On-Premise also requires an outgoing connection to onp-auth.mesibo.com for authentication and billing — ensure your firewall does not block it.
If you are also hosting mesibo backend APIs (described in the backend API section), open your web server ports (80/443) and allow outgoing connections to api.mesibo.com.
If you are running mesibo live server for conferencing, you also need to open all UDP ports.
To open all required mesibo ports, run the appropriate commands for your system. Replace <PORT> with each of 5222, 5223, 4443, 5443, and 8443:
firewall-cmd(Red Hat Enterprise Linux, CentOS, Fedora, and variants):
$ for port in 5222 5223 4443 5443 8443; do sudo firewall-cmd --add-port $port/tcp; done
iptables(Red Hat Enterprise Linux, CentOS, Fedora, and variants):
$ for port in 5222 5223 4443 5443 8443; do sudo iptables -A INPUT -p tcp --dport $port -j ACCEPT; done
ufw(Ubuntu, Debian, and variants):
$ for port in 5222 5223 4443 5443 8443; do sudo ufw allow $port/tcp; done
- If you are running mesibo On-Premise on a public cloud like AWS or Google Cloud, open these ports through the respective service’s security group or firewall configuration panel.
Chatbot and Scripting
mesibo On-Premise includes a powerful chatbot and scripting engine that lets you run custom JavaScript to process messages in real time. Refer to the Chatbot and Scripting Documentation to learn more.
If you are using chatbot and scripting, pass an additional volume mount to specify the directory where On-Premise will store JavaScript files:
$ sudo docker run -v /etc/letsencrypt/archive/mesibo.example.com:/certs \
	-v <your-scripts-folder>:/mesibo/scripts --net=host \
	--ipc=host --name mesibo --rm -d mesibo/mesibo <APP_TOKEN>
Stopping On-Premise
To stop mesibo On-Premise:
$ sudo docker stop mesibo
Or, if you need to use the container ID:
$ sudo docker ps
$ sudo docker stop <CONTAINER_ID>
You can verify it has stopped with sudo docker ps.
Updating mesibo On-Premise Server
Always keep your mesibo Docker image up to date. To update:
$ sudo docker pull mesibo/mesibo
Then stop the running instance and start it again as described above.
Command Line Arguments
All command line arguments must be specified before the app token.
| Argument | Description |
|---|---|
--hostname=<hostname> or -h <hostname> | Override the hostname. Ignored if the TLS certificate already contains the hostname. |
--private or -p | Use when mesibo is deployed on a private network. Disables hostname and IP validation. |
-b <port> | Start the backend API FastCGI server on the specified port (e.g., -b 5000). See the Backend APIs section below. |
Using Backend APIs with On-Premise
When using On-Premise, mesibo has no access to your database, so only a limited set of operations — useradd, userset, and usertoken — are available through the mesibo-hosted backend API. Hence, We recommend hosting the backend APIs on your own server for all On-Premise deployments. All backend API calls then go directly to your own database without passing through mesibo (except useradd, userset), and you get full access to the complete backend API. Refer to Hosting Backend APIs for setup instructions.
Dynamically Loadable Modules
mesibo On-Premise’s dynamically loadable module architecture lets you load your own code directly into the mesibo process for deeper integration with your infrastructure — your own authentication logic, message filtering, AI pipelines, analytics hooks, and more. Refer to the Loadable Modules documentation for details and tutorials.
Deploying with a Cloud Service Provider
All major cloud service providers support Docker containers, so mesibo On-Premise runs on any of them. Note the following:
- If your VM instance has only a private IP address, pass the
-pflag before the token to disable IP validation. - Open all required mesibo ports (
5222,5223,4443,5443,8443) in your provider’s security group or firewall control panel.
For provider-specific documentation on running Docker containers, refer to:
Troubleshooting & FAQ
The following covers common setup issues and frequently asked questions.
If On-Premise is not starting, first run it in the foreground (replace -d with -it) to see logs directly:
$ sudo docker run -v /etc/letsencrypt/archive/mesibo.example.com:/certs --net=host \
	--name mesibo --rm -it mesibo/mesibo <APP_TOKEN>
For issues that require debugging independently of mesibo (for example, MySQL or networking), you can enter the Docker shell directly without starting mesibo:
$ sudo docker run -it --entrypoint /bin/bash -v /etc/letsencrypt/archive/mesibo.example.com:/certs \
        --net=host --ipc=host -v /etc/mesibo:/etc/mesibo mesibo/mesibo
You will get a bash shell where you can run standard Linux commands to investigate.
MySQL Issues
If you have trouble connecting to MySQL, use the mysql command from the Docker shell to test the connection directly:
# mysql -h <dbhost> -D <dbname> -u <dbusername> -p
Note, if the mysql command cannot connect, mesibo cannot either — the connection path is identical. Since we do not have visibility into your setup, we are unable to help with this. Common causes are missing database grants for the Docker container’s IP, or firewall rules blocking the connection. You will find extensive help for these scenarios on Stack Overflow and in the MySQL and Docker documentation.
One common mistake is using localhost or 127.0.0.1 as the database host — this does not work in a Docker environment. Use the actual host IP address, and ensure your database grants access to the user from the Docker host’s IP address. You can find the Docker host’s IP using the ifconfig command.
Certificate Issues
If you have a certificate-related issue, first verify that you followed all the instructions in Step 4 - Configuring TLS Certificate.
If issues persist, enter the Docker shell and check that all certificate files are present:
# ls /certs
README  cert.pem  chain.pem  fullchain.pem  privkey.pem
If any files are missing:
- Check for permission issues on the folder and verify the folder name passed with the
-voption. - Ensure you are passing a real folder, not a symlink or hard link. The Let’s Encrypt
livefolder is a symlink — try using thearchivefolder instead (for example,/etc/letsencrypt/archive/example.mesibo.com). - Alternatively, copy your certificate files to a new folder with permissions like 0755 and use that folder.
If Docker cannot access your files, neither can mesibo, since mesibo runs inside the container. Search online or on Stack Overflow for help mounting folders in Docker containers.
If all files are present, verify the certificate validity:
# cd /certs
# openssl x509 -in cert.pem -text -noout
# This should print certificate info. Check the CN and validity fields.

# openssl rsa -in privkey.pem -check
# This should print valid key information.
IP Address Mismatch
mesibo On-Premise checks that the IP address of the host machine matches the hostname in your DNS or TLS certificate. If your domain xyz.example.com resolves to 1.2.3.4, that same IP must be configured on the machine running mesibo. mesibo will print an error and exit if no match is found.
In VM environments (such as Google Cloud or Amazon EC2), the VM often has a private IP that does not match the public hostname. In this case, disable the IP check using the -p flag:
$ sudo docker run -v /etc/letsencrypt/archive/mesibo.example.com:/certs --net=host \
		-d mesibo/mesibo -p <APP_TOKEN>
Connection Issues
Ensure that all required ports (5222, 5223, 4443, 5443, 8443) are open as described in the Firewall Settings section above. You can test connectivity using netcat:
$ netcat <IP> 5222
Unable to verify app token.
Check your firewall and ensure outgoing connections to onp-auth.mesibo.com are allowed from your Docker container. Then restart the Docker container.
Other Issues
The On-Premise server may print informational messages alongside errors even when it is ready. If the logs look healthy, try connecting a client. If the client cannot connect, check your incoming firewall rules — this is the most common cause when running on cloud providers like AWS or Azure.
Contact Us
If you still need help after working through the above, contact us with complete logs and a description of everything you have tried. Since you are running On-Premise, we have no visibility into your setup, so please include details like IP addresses (from ifconfig or ip addr), certificate information, and the exact commands you ran.
FAQ
For the full FAQ section on On-Premise, refer here.
I am currently using mesibo Cloud. If I enable On-Premise, how quickly will users switch?
As soon as you enable On-Premise in the Console, your users will start connecting to your On-Premise server. Ensure the configuration is complete and the Running Status field in the Console shows your hostname before enabling On-Premise.
Can I switch from On-Premise back to mesibo Cloud?
Yes. Disable On-Premise in the Console and then stop your mesibo Docker container. Your users will reconnect to mesibo Cloud after a few retries.
Note: Messages stored in your On-Premise database are not accessible from mesibo Cloud. If you switch back, users will not see messages that were delivered while running On-Premise.
I have enabled On-Premise and my server is running — how do I know if my app is connected?
Check the server logs:
$ sudo docker logs mesibo
When a user logs in, you will see a login entry for that user.
What happens if I have enabled On-Premise but my server is not running?
- If
Auto Fallbackis disabled: Users will be unable to connect and will not receive service. - If
Auto Fallbackis enabled: Users will switch to mesibo Cloud after a few retries. Note that messages stored in your On-Premise database will not be accessible during fallback — mesibo Cloud has no access to your database.
What happens if a user is connected to my server and I disable On-Premise from the Console?
If your server is still running, users will continue connecting to it — they are not notified of the Console change until they reconnect. If you also stop the Docker container, users will be redirected to mesibo Cloud after a few retries.
Can I run mesibo On-Premise on a Cloud Service Provider?
Yes. All major cloud providers support Docker. Refer to the Deploying with a Cloud Service Provider section above.