Troubleshooting Push Notifications
Push notifications are crucial for keeping your app users engaged and informed. If you’re facing issues with push notifications, follow these steps to troubleshoot and resolve the problem. Do not skip any steps or the final note. We have covered all scenarios, common mistakes, and even provided you with scripts to bypass mesibo and send push directly.
Step 1: Verify Firebase and Apple Push Credentials
Ensure that you have correctly configured the push credentials for Android (Firebase) and iOS (Apple Push Notification Service) in the mesibo console as described here. Common mistakes include:
Android Firebase Credentials: Double-check that the project and client ID from the uploaded credentials match the ones used for generating the push token.
Apple P12 Certificate: Verify that the bundle ID matches your app’s bundle ID. If they don’t match, push notifications will be rejected.
Step 2: Check the Push Token
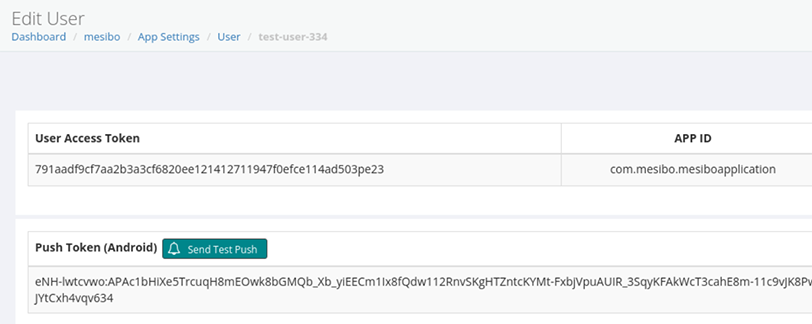
Confirm that you have obtained and set the push token correctly, as described in the documentation. You can verify this by checking the user details in the mesibo console, which should display the push token and will also allow you to send a test push notification.
Step 3: Use Background Push and not Alert
mesibo sends Background Push notifications by default, which is the recommended configuration. Your app should utilize Background Push in conjunction with local notifications to display push notifications instead of using alerts. Avoid using alerts unless you fully understand the implications.
Step 4: Check if you are using Firebase Push Tokens for iOS Applications
For iOS applications, it is generally recommended to use Apple Push Tokens instead of Firebase Push Tokens. However, if you decide to use Firebase API to generate push tokens for your iOS app, it is mandatory to upload FCM (Firebase Cloud Messaging) credentials to mesibo. Uploading APN (Apple Push Notification service) certificates alone will not be sufficient.
Additionally, you should refer to the Firebase documentation to properly configure APN certificates in their settings. Since we do not have access to your Firebase settings, we cannot provide much support if you choose to use the Firebase API for your iOS application. We strongly advise using APN and Apple Push Tokens for iOS.
Step 5: General Troubleshooting
Before we describe more advanced troubleshooting using webhooks and enabling push notification debugging in the next step, read through the General Troubleshooting and iOS-specific Troubleshooting steps below.
General Troubleshooting
If your app doesn’t receive the push, check the following:
- Ensure that you are testing push notifications under normal conditions. Your app will not receive push if you “force stop” the app, clean the app cache, etc.
- Ensure that you have configured push notification credentials for your app correctly on the mesibo console.
- Ensure that your phone is not in Do-Not-Disturb mode.
- Keep your phone on cellular data and see if you are receiving push notifications.
- Check if other apps on your phone receive push notifications.
- mesibo sends push only when your app is suspended and disconnected. It may take a few seconds (or minutes) depending on the operating system and the device configuration.
- mesibo rate-limits push notifications per user to prevent excessive notifications to one user from impacting your entire app, since FCM/APNs throttle globally. You can disable this setting in on-premise deployments, though it is not recommended.
- Ensure that you are using Background Push and not Alert.
Additional Troubleshooting Steps for iOS
- While PushKit is ideal for calls, iOS 13 and newer mandatorily require CallKit integration and reporting when using Push Tokens, which does not work well with Video Calls. If not integrated correctly, iOS will terminate your app. Refer to Apple documentation and WWDC talk Advances in App Background Execution. Also, according to these threads (here, here, and here), only a few apps (WhatsApp, FB Messenger, Telegram) are given special privileges. Unless your app is also granted those privileges, we currently do not recommend using PushKit.
- Use the Production Certificate, not the development certificate. The mesibo console will give you a warning but will accept the certificate. However, your device is likely to not receive push notifications if you use the wrong certificate.
- Ensure that the bundle ID on the certificate matches your app bundle ID. If you are using the mesibo demo app, you need to change the bundle ID to match your certificate.
- Do not change the
APS entitlementssetting unless you know what you are doing. By default, it is set todevelopmentfor development builds and set toProductionby Xcode when you upload your app to the App Store for release or TestFlight. This setting determines the APN endpoint used for sending push notifications. If you change this toProduction, you may need to route all sandbox pushes to the production APN server.
Step 6: Configure Webhook to Receive Push Notification Results
If your app still cannot receive push notifications after the above steps, you can debug the issue using webhooks. When a push notification fails, you will receive a webhook request from mesibo containing information about the push event, including the request sent to FCM/APN and the response received.
To enable this, check the Push Notification Results checkbox in Webhook settings in the console. In the webhook payload, inspect the request and response fields to understand the reason for failure or why the push service (FCM/APN) rejected the push — for example, misconfigured credentials.
Refer to mesibo Real-time Webhooks for details on setting up a webhook and using the push event type to debug failed push notifications.
In the push event, the response.code field contains the error code indicating the reason for failure.
If FCM/APN rejected the push, refer to their respective error code documentation:
If mesibo rejected the push, the error code will be greater than 900. Refer to the table below for special error codes and their meanings:
| Error Code | Description |
|---|---|
| 901 | Push service for the app is not configured |
| 902 | Push service for the app is temporarily disabled |
| 903 | Push certificate expired |
| 904 | Push certificate error |
| 905 | Production certificate is required for this push |
| 911 | Bad push token |
| 912 | Mismatch in APN certificate and the push token app id |
| 913 | Bad payload |
| 914 | Ratelimit reached |
Step 7: Enable Push Debugging
You can also enable Push Notification Debugging from App Settings -> Push Notifications in the mesibo console. This sends additional data over the webhook, even for successful pushes. Since debugging requires more CPU resources, it can be enabled for 3 hours out of every 8 hours.

Step 8: Sending Test Push Notifications using API
You can send test push notifications using the mesibo backend API to troubleshoot push delivery issues. This is particularly useful for verifying your push configuration and debugging connectivity problems.
Refer to the mesibo Backend API Push Notifications documentation for details.
Testing Push Delivery
Use the pushtest operation to send test notifications to specific user addresses. This helps verify that your push credentials are correctly configured and that notifications can reach target devices.
Debug Mode
Use the pushdebug operation to enable detailed debugging information for all push notifications sent to FCM or APN. This provides comprehensive logs of push delivery attempts, success/failure status, and detailed error information.
Note:
- Cloud deployments have rate limiting and time restrictions for debugging.
- On-premise deployments have no such limitations.
Additional Troubleshooting for On-Premise Deployments
If you are using mesibo on-premise, you can enable detailed push notification logs to help with debugging and monitoring push delivery. Push logging can be configured through the local configuration file.
To enable push logs, refer to the Logging Configuration section. Set the push parameter to 1 in your logging configuration:
logs {
    push = 1
}
Additionally, for testing purposes, you can disable push notification rate limiting in the mesibo console. However, this is not recommended for production environments.
Step 9: Push Successfully Delivered to FCM/APN but Not Received on Device
This is the most commonly misunderstood scenario. If your webhook response or server logs show a 200 response code — for example, push_on_complete ... code 200 — mesibo has successfully delivered the push notification to FCM/APN. At this point, mesibo’s role ends, and delivery to the device is entirely outside of mesibo’s control.
If you are seeing successful delivery to FCM/APN (code 200) but notifications are not arriving on the device, the issue lies with one or more of the following — none of which mesibo can investigate or resolve on your behalf:
- FCM/APN delivery policies: Throttling, priority handling, and queuing decisions made by Google or Apple.
- Device state: Background restrictions, battery optimization, or the app being killed by the OS. This is a particularly common cause on Android — if the app is not opened for a day or two, the OS may aggressively restrict or stop delivering push notifications.
- Network conditions: Poor connectivity, firewall rules, or carrier-level filtering on the device.
- OS-level behavior: On iOS, APNs may silently drop or delay notifications based on device usage patterns, Low Power Mode, or app state. Intermittent delivery on iOS is almost always due to APNs behavior, not a mesibo issue.
On Android:
- Check whether battery optimization is restricting background activity for your app (
Settings -> Battery -> App Battery Usage). - Ensure the app is not being killed by the device’s task manager or memory cleaner.
- Test on a device where battery optimization is disabled for your app to confirm.
On iOS:
- Verify the device is not in Low Power Mode, which restricts background delivery.
- Check that Background App Refresh is enabled for your app.
- Test across different network conditions (Wi-Fi vs. cellular).
- Remember that APNs may coalesce or drop notifications if the device is unreachable or if delivery quotas are exceeded — this is governed by Apple, not mesibo.
Final Note
mesibo’s role is to reliably deliver push notifications to FCM or APN depending on the type of device and your configuration. Once mesibo delivers the notification to FCM/APN and receives a 200 response, it is entirely up to FCM or APN to decide whether and when to deliver it to the device — mesibo has no control over this final step.
This is a fundamental aspect of how push notification infrastructure works across the industry. It is not a limitation specific to mesibo; every push notification service operates within the same constraints.
If push notifications are not reaching devices, use the webhook responses and debugging features described in the steps above to determine where the failure is occurring:
- Non-200 response code from FCM/APN → Issue is likely with token, push credentials, or configuration. Follow Steps 1–8 above.
- 200 response code from FCM/APN → Issue is on the FCM/APN/device side. Refer to Step 9 above. mesibo cannot investigate or resolve this.