
Setting up iOS APN and Android FCM Push Credentials
Before we describe how to configure your Push credentials, ensure that you have
- Apple Push Certificate (in .p12 format) for your iOS Apps
- Google/Firebase FCM key
It is also important for you to understand about type of notifications (visible and invisible) so that you can appropriately configure it. There are two kinds of push notification:
Background notification: This type of notifications are NOT visible (
datatype in Android andbackgroundorVoIPtype in iOS).Alerts: These are visible alerts (
notificationtype in Android andalerttype in iOS).
By default, mesibo sends a background notifications (invisible type) that wakes your app in the background, and then the application can start mesibo to receive all the messages. Once your app receives messages, it can then use local notification to show the notification. This is a recommended way of receiving push for real-time application as it gives you the finer control on when and what to show in the notification. However, you can change this default behavior from the mesibo consoleopen_in_new by disabling the Background push checkbox. It will then send visible push alerts.
It is highly recommended that you refer to the mesibo messenger app source code to see how it is implemented there.
Now let's setup push credentials in the mesibo console.
Setting up Push notification Credentials in the mesibo Console
Follow the steps below to configure your push notification credentials.
Go to your App settings in the mesibo consoleopen_in_new. Go to the section Push Notifications and turn ON the switch to enable push notifications. Now, enter the necessary details in FCM and APN sections.
Configure FCM Credentials for Android Notifications

- Get the Firebase Sender ID and Firebase Server Key from Firebase Consoleopen_in_new of your app. Enter it in the mesibo consoleopen_in_new. Refer to the Firebase Documentationopen_in_new and FCM Messagesopen_in_new if requires.
- Enter the credentials that you got- Firebase Sender ID and Firebase Server Key in - Firebase Cloud Messaging (FCM) Configuration section.
- Under push, settings select Background Push (recommended) or set your required push notification type.
Configure APN/VoIP Credentials for iOS Notifications
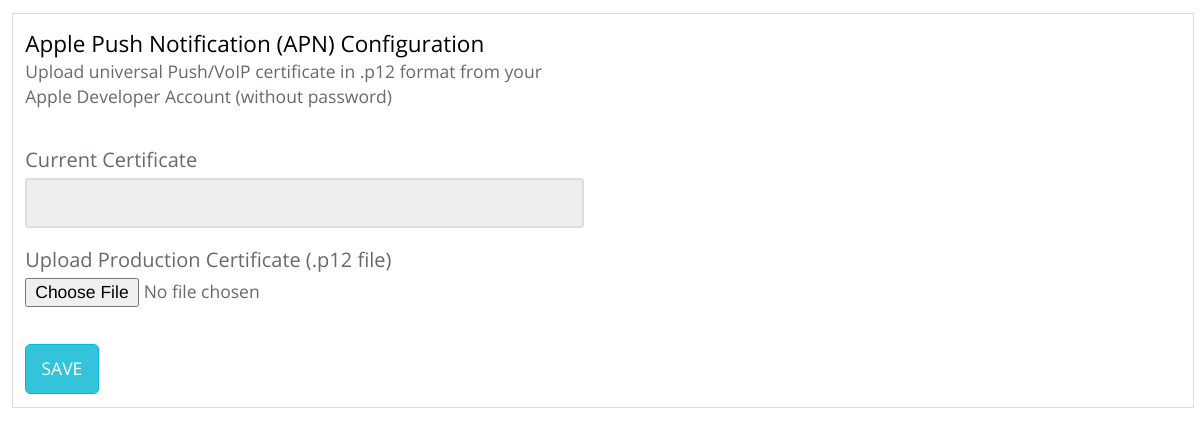
- Go to your App settings in the mesibo consoleopen_in_new. Go to the section Push Notifications and turn ON the switch to enable push notifications. Now, enter the necessary details in Apple Push Notification (APN) Configuration
- Get the universal Push/VoIP certificate in .p12 format from your Apple Developer Accountopen_in_new. Refer to Obtain a Provider Certificate from Appleopen_in_new
- Choose the universal Push/VoIP certificate file that you downloaded earlier and upload it in the Apple Push Notification (APN) Configuration section.
- Under push, settings select Background Push (recommended) or set your required push notification type.
Use the Production Certificate, not the development certificate. Mesibo console will give you a warning but will accept the certificate. However, your device is likely not to receive push notifications.
Push Settings
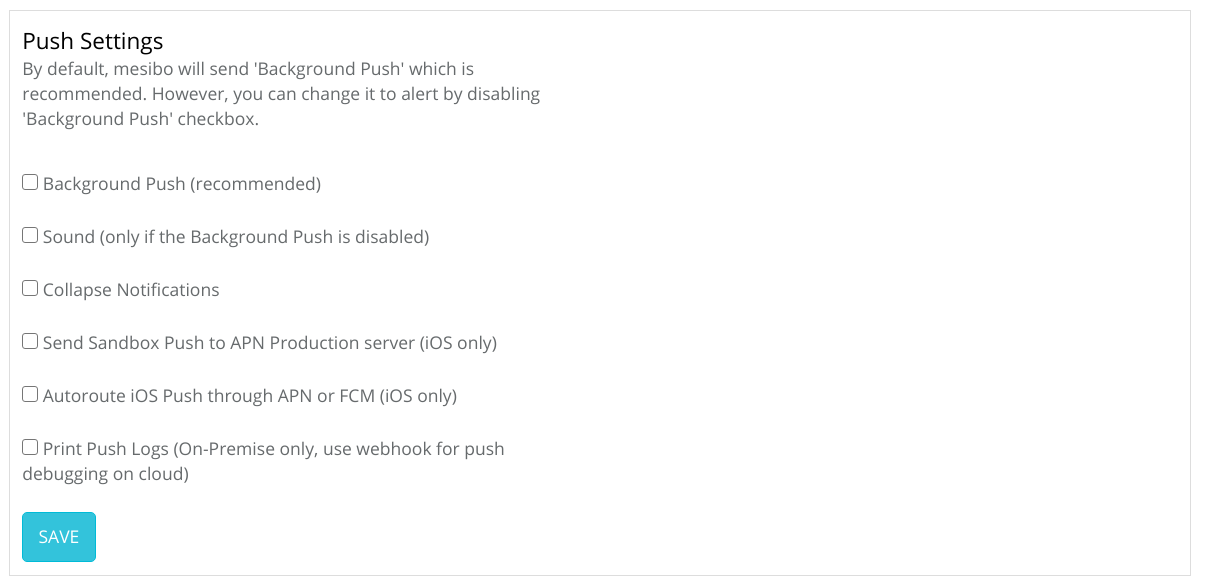
You can configure additional push notification settings in the mesibo consoleopen_in_new.
Background Push, By default, mesibo will send 'Background Push', which is recommended. However, you can change it to alert by disabling the 'Background Push' checkbox.
Sound, Play a notification sound to alert the user. You can enable this only if you have disabled background push(silent push)
Collapse Notifications, Check this box to group multiple notifications and make them collapsible.
Send Sandbox Push to APN Production server, If you want all your push requests to go to the production APN server even while using a development environment, enable this option. For more information, refer to the Troubleshooting section.
Autoroute iOS Push through APN or FCM, If you have configured FCM credentials and would like to route iOS push through FCM, check this option.
Print Push Logs, If you are using on-premise, check this to enable Debug Logs. You can then see logs in the on-premise server logs for every push request send to FCM or APN and the result. If you are using mesibo cloud, see Debugging Push Notifications using Webhooks
Sending push notification to your users
Once you setup the above information in the mesibo consoleopen_in_new, mesibo is almost ready to send push notifications to your users. However, mesibo still requires a unique token per user so that it can send push notifications to that particular user. You need to obtain that user-specific device token from using Android or iOS API and then send it to mesibo using setPushToken() API.
Sending push notification token in Android
To understand how to get the user push token, refer to Firebase Docsopen_in_new, Or this detailed tutorial on Android Push Notificationsopen_in_new
Use Mesibo
setPushtoken()API to send push token to mesibo.
Refer to the Messenger App Source code for Android, which uses setPushtoken API
Sending push notification token in iOS
Unlike Android, iOS has two separate tokens, one for push and one for VoIP (PushKit). You only need to use push token.
Refer APN Docsopen_in_new or this detailed tutorial on iOS Push Notificationsopen_in_new
Use Mesibo
setPushtoken()API to send push token to mesibo.
Refer to the Messenger App Source code for iOS, which uses setPushtoken API
Troubleshooting
General Troubleshooting
If your app doesn't get the push, check the following:
- Ensure that you have configured push-notification credentials for your app correctly on the mesibo consoleopen_in_new.
- Keep your phone on the cellular data and see if you are receiving push notifications
- See if other apps on your phone receive it
- mesibo will only send push when your app is suspended and disconnected. It may take a few seconds (or minutes) depending on the operating system and also the device configuration.
Additional Troubleshooting Steps for iOS
- Ensure that you are not using PushKit Tokens. iOS will terminate your app if you misuse PushKit tokens. Refer to Apple documentation and also WWDC talk Advances in App Background Executionopen_in_new.
- Use the Production Certificate, not the development certificate. Mesibo console will give you a warning but will accept the certificate. However, your device is likely not to receive push notifications.
- Ensure that the bundle ID on certficate matches your app bundle ID. Note, if you are using Mesibo demo app, you need to change bundle ID to match your certificate.
- Don't mess with the
APS entitlementssetting unless you know what you are doing. By default, it is set todevelopmentfor the development and set toProductionby Xcode when you upload your app to the App Store for release or test flight. This setting impacts the selected APN endpoint for sending push notifications. Hence, if you change this to say 'Production', you may need to send all your sandbox pushes to the production APN server
Troubleshooting using Custom Scripts
Another troubleshooting option is to send a push notification yourself and see if it helps. Use one of the scripts below to send push notifications to your device. Once it is working, you can set up the mesibo webhook, which will be invoked when the destination is offline. You can then send push notifications from the webhook using your custom scripts. You can also use webhooks to inspect the push request sent by mesibo and the response received from FCM/APN. See Debugging Push Notifications using Webhooks.
Use the following PHP script to send push notifications to Android devices.
<?php

function android_push($to) {
	$apiKey = 'FCM API KEY';
	$url = 'https://fcm.googleapis.com/fcm/send';

	$priority = "high";
	$type = "data"; // or 'notification' .

	$message = "none"; // your message
	$topic = ''; // not using, https://developers.google.com/cloud-messaging/topic-messaging
	$collapse_key = 'NEWMESSAGE';

	// there are two kinds of messages, data (default priority normal) and notification (default priority high).
	$fields = array(
			'to' => $to,
			'priority' => $priority,
			'collapse_key' => $collapse_key,
			$type => array( "message" => $message ),
		       );

	$headers = array(
			'Authorization: key=' . $apiKey,
			'Content-Type: application/json'
			);

	// Open connection
	$ch = curl_init();

	// Set the URL, number of POST vars, POST data
	curl_setopt( $ch, CURLOPT_URL, $url);
	curl_setopt( $ch, CURLOPT_POST, true);
	curl_setopt( $ch, CURLOPT_HTTPHEADER, $headers);
	curl_setopt( $ch, CURLOPT_RETURNTRANSFER, true);
	curl_setopt($ch, CURLOPT_SSL_VERIFYPEER, false);
	curl_setopt($ch, CURLOPT_POSTFIELDS, json_encode( $fields));

	// Execute post
	$result = curl_exec($ch);

	// Close connection
	curl_close($ch);

	$r = json_decode($result, 1);
	if(isset($r['failure']) && $r['failure'] > 0) {
		print_r($r);
		return false;
	}

	return true;
}
Use the following PHP script to send push notifications to iOS devices.
<?php
$token = "Client Token";

// APN certificate
$certificate = 'universal_cert.pem';

$message = '{"aps":{"action":"message","title":"your_title","body":"your_message_body"}}';
$apn_server = 'https://api.development.push.apple.com'; // or 'api.push.apple.com' if production
$bundle_id = 'com.mesibo.app';

$status = apn_push(true, "alert", $apn_server, $certificate, $bundle_id, $message, $token);
echo $status;

//type can be alert,voip, etc. Refer to APN documentation
function apn_push($production, $type, $apn_server, $certificate, $bundle_id, $message, $token) {

	$apn_server = 'https://api.development.push.apple.com';
	if($production) {
		$apn_server = 'https://api.push.apple.com';
	}


	$url = "{$apn_server}/3/device/{$token}";
	$cert = realpath($certificate);

	// headers
	$headers = array(
		"apns-topic: {$bundle_id}",
		"User-Agent: mesibo",
		"apns-push-type: {$type}",
		"apns-priority: 5",
	);

	// open connection
	$ch = curl_init();

	curl_setopt_array($ch, array(
		CURLOPT_HTTP_VERSION => CURL_HTTP_VERSION_2_0,
		CURLOPT_URL => $url,
		CURLOPT_PORT => 443,
		CURLOPT_HTTPHEADER => $headers,
		CURLOPT_POST => TRUE,
		CURLOPT_POSTFIELDS => $message,
		CURLOPT_RETURNTRANSFER => TRUE,
		CURLOPT_TIMEOUT => 30,
		CURLOPT_SSL_VERIFYPEER => false,
		CURLOPT_SSLCERT => $cert,
		CURLOPT_HEADER => 1,
		CURLOPT_RETURNTRANSFER =>true
	));

	$result = curl_exec($ch);
	if ($result === FALSE) {
		$error = curl_error($ch);
		echo "curl faild: $error";
		curl_close($ch);
		return false;
	}

	// get response
	$status = curl_getinfo($ch, CURLINFO_HTTP_CODE);
	curl_close($ch);
	if($status == "200")
		echo "OK";
	else
		echo "FAIL: $status";

	return false;

}
Troubleshooting using Webhooks
If your app cannot receive push notifications, even after troubleshooting with the steps above, you can also debug the issue with push notifications using webhooks.
You can inspect the push request and response, which can be made available to you through webhooks. To do this, check Notify failed push notifications while setting up Webhook, in the
consoleopen_in_new. When a push notification fails, you will receive a webhook request( a POST request) from mesibo, and the payload will contain information about the
push event. In the webhook payload, you can inspect the request and the response so that you can understand the reason for failure or why the push service(FCM/APN) rejected the push. For example, if you did not configure the right credentials, etc.
Refer mesibo Real-time webhooks to know about setting up a webhook and using the push event type to debug failed push notifications.
In the push event, the response.code field will contain the error code which indicates the reason for failure.
If FCM/APN rejected the push, then refer to respective documentation of push notification error codes.
- For FCM, refer hereopen_in_new
- For APN, refer hereopen_in_new
If Mesibo rejected the push, then the error code will be a value greater than 900. Refer to the table below for special error codes and their meaning:
| Error Code | Description |
|---|---|
| 901 | Push service for the app is not configured |
| 901 | Push service for the app is temporarily disabled |
| 903 | Push certificate expired |
| 904 | Push certificate error |
| 905 | Production certificate is required for this push |
| 911 | Bad push token |
| 912 | Mismatch in APN certificate and the push token app id |
| 913 | Bad payload |